TL;DR:
- Neglecting dithering during audio export can introduce gritty, digital distortion that undermines a professional sound. Dithering adds subtle random noise before bit-depth reduction, preserving transparency in quiet passages and reverb tails. Applying dither as the final step ensures a clean, natural-sounding master across all formats and listening environments.
You export your final master, load it up for a critical listen, and notice something wrong. A faint, gritty texture creeps in underneath the reverb tail on the last track. The quiet intro sounds grainy, almost mechanical. Nothing in your mix session explains it, yet there it is, sitting right on the edge of audibility and ruining an otherwise polished record. The culprit is almost always the same overlooked step: dithering. Most musicians and even some producers skip it entirely, treating it as optional technical housekeeping. It is not. Dithering is one of the most important final steps in professional mastering, and understanding it will change the way you prepare music for release.
Table of Contents
- What is dithering and why does it matter in mastering?
- How dithering prevents digital distortion: the science
- Types of dithering: which one is right for your master?
- Applying dithering in your workflow: when, where, and how
- A mastering engineer's perspective: why dithering is more critical than most artists realize
- Enhance your masters with professional dithering support
- Frequently asked questions
Key Takeaways
| Point | Details |
|---|---|
| Dithering prevents artifacts | Applying the right dither removes harsh digital distortion, especially during quiet or fading passages. |
| Choose dither type wisely | Different dither types suit different music and media—noise-shaped isn’t always best for every master. |
| Apply dither only once | For clean results, dither must be the very last step in your mastering workflow before final export. |
| Transparency is professional | A properly dithered master sounds transparent and high-quality, meeting pro standards across all formats. |
What is dithering and why does it matter in mastering?
When you record, mix, and master audio, you typically work at a high bit depth, usually 24-bit or 32-bit float. These formats store an enormous amount of audio information, giving your signal tremendous dynamic range and headroom. The problem arrives when you need to deliver your master in a lower bit depth format, most commonly 16-bit for CDs or many streaming platforms.
Bit depth determines how many discrete "steps" a digital system uses to represent the loudness level of a sound at any given sample. A 24-bit file uses roughly 16.7 million possible values. A 16-bit file uses only 65,536. When you reduce bit depth, the system must round off audio values to fit within the available steps. That rounding process introduces quantization distortion, a mathematically predictable, harmonically related noise that the human ear interprets as a harsh, gritty texture.
"Dither preserves transparency through quiet passages and fade-outs, and prevents grainy digital distortion near the noise floor." Source: What Is Dither in Audio Mastering and Why Use It?
Dithering is the technique that solves this problem. It works by intentionally adding a very small amount of random, low-level noise to the audio signal before the bit depth is reduced. This random noise randomizes the rounding errors so that they no longer form a predictable, harmonically related pattern. Instead of a harsh gritty artifact, you get a soft, uniform noise floor that is far less objectionable to listeners. The result is a master that sounds clean, transparent, and professional even in the quietest moments.
Here is what dithering protects in practical terms:
- Fade-outs: Long, slow fades drop into the low-amplitude range where quantization errors are most severe. Dithering keeps them smooth and natural.
- Reverb tails: Decaying reverb lives near the noise floor. Without dithering, the tail can take on a digital, metallic quality.
- Quiet intros: Sparse arrangements with soft instruments are particularly vulnerable to audible quantization distortion.
- Dynamic recordings: Classical, jazz, and acoustic recordings with wide dynamic range are most affected by poor bit-depth conversion.
Following a thorough audio quality checklist before you export will help you catch dithering omissions before they become problems in the final release. It also helps to understand how dithering connects to the broader goal of enhancing clarity in mastering across all formats.
Pro Tip: Always apply dither as the very last process before rendering your final master. Any additional processing after dithering will re-introduce quantization issues, forcing you to dither again and compounding the noise floor.
How dithering prevents digital distortion: the science
Quantization distortion is not like analog tape hiss or electrical noise. It is a mathematically determined artifact that tracks the audio signal itself. Because the distortion is harmonically related to the music, the human auditory system actually identifies it as an unnatural, unpleasant sound, often described as "gritty," "grainy," or "digital sounding." This effect is at its worst when the audio signal is at very low levels, close to the noise floor of the lower bit depth format.
The engineering literature supports this clearly. Dither with appropriate noise shaping has been shown to improve the coding efficiency and perceived transparency of digital audio systems compared to deterministic truncation (simple rounding without dither). In other words, a small, random noise is genuinely less damaging than a predictable, correlated distortion.
"Dither prevents correlated distortion from appearing as grainy artifacts by substituting a randomized, low-level noise signal that the ear finds far less intrusive." Source: What Is Dither in Audio Mastering and Why Use It?
The table below summarizes when quantization distortion is most and least audible, and how dithering addresses each scenario.
| Audio scenario | Quantization distortion risk | Dithering benefit |
|---|---|---|
| Full-mix, loud sections | Low (signal masks errors) | Minimal, but still recommended |
| Sparse arrangement, mid-level | Moderate | Noticeable improvement in clarity |
| Fade-outs and reverb tails | Very high | Critical, smooths transitions completely |
| Quiet intros or ambient passages | Very high | Essential for transparent sound |
| Silence between tracks | Extreme | Required to avoid audible digital artifacts |
Reviewing common mastering errors will show you that skipping dither consistently ranks among the most frequently spotted mistakes in independent releases. Engineers can hear it immediately, and so can careful listeners with good playback systems.
Pro Tip: Dither once, at the final stage only. If you add any EQ, limiting, or any other process after dithering, you must export again with fresh dither applied at that new final stage. Double-dithering raises the noise floor unnecessarily and should always be avoided.
Types of dithering: which one is right for your master?
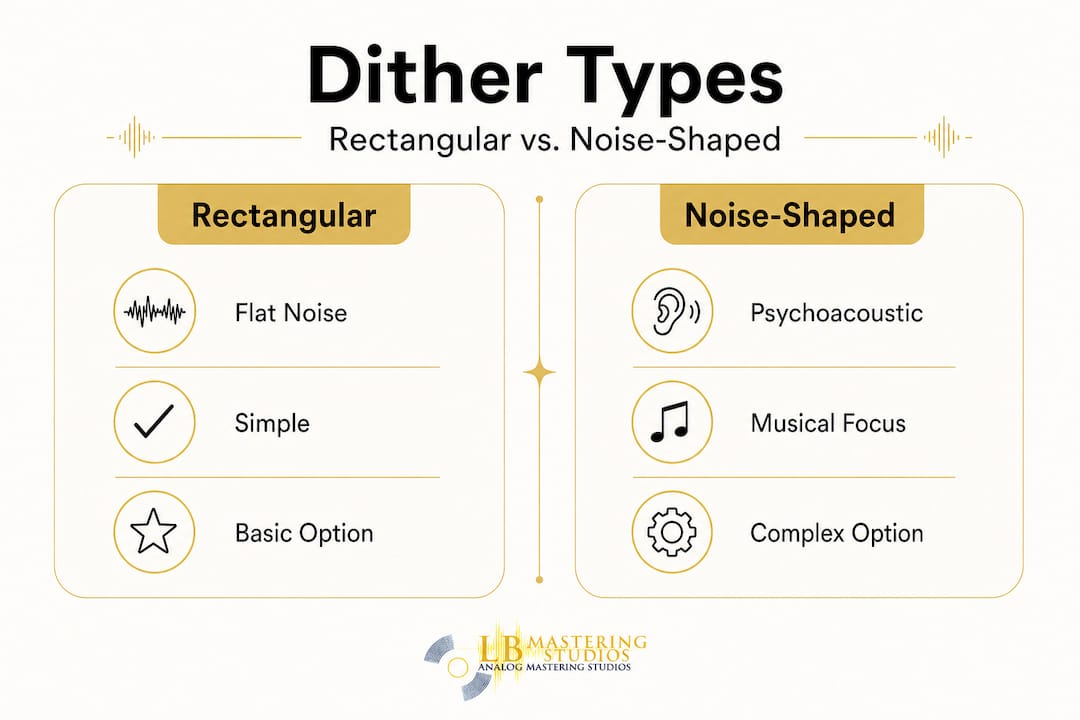
Not all dithering is created equal. The two main types you will encounter in professional mastering software and plugins are rectangular (basic) dither and noise-shaped dither. Each has specific strengths, and choosing wisely depends on your music and the format you are targeting.
Rectangular dither is the simpler of the two. It adds a flat, evenly distributed random noise across the full frequency spectrum. It is effective, reliable, and appropriate for most general mastering scenarios. It is also the safest choice when you are unsure, because it introduces no additional frequency shaping or coloration.
Noise-shaped dither is more sophisticated. It uses psychoacoustic principles (the science of how humans perceive sound) to redistribute the dither noise into frequency ranges where the human ear is least sensitive, typically above 10 kHz. This technique makes the noise floor even less perceptible, which can improve the apparent dynamic quality of a master, particularly on high-resolution playback systems.
However, as engineering research confirms, noise-shaped dither improvements are conditional and depend heavily on the source material. There is no single dither type that is best for every situation.
| Dither type | Best suited for | Media format | Trade-offs |
|---|---|---|---|
| Rectangular (basic) | Pop, rock, hip-hop, EDM | CD, streaming, broadcast | Adds flat noise; audible on high-end systems |
| Noise-shaped | Classical, jazz, acoustic, ambient | CD, high-resolution audio | Can introduce artifacts if misapplied |
| No dither | 32-bit float internal renders | Not for final distribution | Leaves quantization errors on 16-bit export |
Key considerations when selecting your dither type:
- Genre matters. Wide-dynamic-range recordings in classical and jazz benefit most from noise-shaped dither, where the quiet passages are crucial and the listening environment demands clarity.
- Format matters. Streaming platforms like Spotify normalize loudness using the LUFS standard, which can affect how dither noise interacts with your audio. Check your target platform's delivery specs carefully.
- Your DAW's default matters. Some digital audio workstations (DAWs) apply dither automatically on export. Know your software settings to avoid double-dithering.
Studying mastering equipment examples can give you a clearer picture of how professional studios integrate dithering into their signal chains using both hardware and software tools.
Applying dithering in your workflow: when, where, and how
Understanding dithering conceptually is one thing. Applying it correctly in a real mastering session is another. Here is a clear, step-by-step process for integrating dithering properly into your workflow.
- Finish all processing first. Complete every stage of mastering: EQ, compression, limiting, stereo enhancement, and loudness optimization. Dithering must be the absolute last step.
- Identify your target bit depth. Determine the final delivery format. CD and most streaming platforms require 16-bit. High-resolution releases may stay at 24-bit, in which case dithering from 24 to 16 is still often needed for consumer formats.
- Select the appropriate dither type. Use rectangular dither for most contemporary genres. Use noise-shaped dither for acoustic, classical, or jazz recordings where dynamic preservation is paramount.
- Apply the dither plugin or setting in your DAW. Position it as the final insert on your master bus, after your limiter. Ensure no other processing follows it in the chain.
- Export your master file. Render at the target bit depth. Do not apply any further processing to this exported file.
- Verify your results. Listen carefully to fade-outs, reverb tails, and quiet passages. A properly dithered master will sound smooth and natural at low levels without any gritty or granular texture.
As confirmed by mastering standards, dithering must be applied only once and at the final stage to prevent cumulative noise buildup. Applying it multiple times compounds the noise floor and undermines the benefit entirely.
Checklist for correct dither application:
- All mastering processing is complete before dithering
- Dither is positioned as the last plugin in the signal chain
- Dither type matches the music genre and target format
- Export bit depth matches delivery specifications
- No additional processing is applied after export
Common mistakes that engineers see in submitted masters:
- Rendering at 24-bit and then converting without dithering. This is the most frequent error and the direct cause of the gritty fade-out problem described at the start of this article.
- Double-dithering. Applying dither during the DAW export and using a separate dithering plugin simultaneously adds noise without benefit.
- Wrong dither type for the format. Using noise-shaped dither aggressively on highly compressed, loud pop material can actually introduce audible high-frequency artifacts.
Using an audio mastering checklist alongside reference tracks that were professionally mastered gives you reliable benchmarks for verifying that your dithering is working correctly before you submit for distribution.
Pro Tip: When in doubt about which dither type your DAW applies by default, render a test export of just a fade-out. Zoom in on the waveform in a separate audio editor and listen on headphones. A properly dithered fade sounds smooth. An undithered fade shows stepped, geometric waveform edges and sounds gritty.
A mastering engineer's perspective: why dithering is more critical than most artists realize
Here is something we have seen consistently over 44 years of mastering work: the artists who dismiss dithering as a "technical detail" are usually the same ones who call us weeks later wondering why their master sounds degraded on vinyl or why the streaming version has a strange quality at the end of tracks.
Most independent artists hear dithering discussed, assume it is something their software handles automatically, and never confirm whether that assumption is actually correct. Many DAWs do apply dither by default, but the settings are often buried in export dialogs, and the wrong box gets checked far more often than people realize. The result is a release that sounds slightly off in a way that is hard to identify but impossible to ignore once you know what you are hearing.
The stakes are higher than most artists appreciate. On streaming platforms, the loudness normalization process can actually bring quiet sections up in level, making quantization artifacts that were barely audible at normal listening levels suddenly obvious. On vinyl, the cutting process interacts with the noise floor in ways that make undithered digital artifacts translate into physical groove distortions. A master that passes a quick desktop speaker check can fail badly on a quality turntable or a high-end headphone system.
Preserving transparency through fade-outs and quiet passages is the mark of a truly professional master. Experienced engineers can spot an undithered track within seconds by soloing a fade-out. It is that telling. The fade either sounds natural and smooth or it breaks down into that characteristic grainy texture. There is no middle ground.
What we find important to emphasize is this: dithering done correctly is invisible. Your listeners will never know it is there. But when it is missing, they will feel something is wrong, even if they cannot name it. That sense of unease, that subtle wrongness, is what separates a record that sounds professional from one that sounds almost professional. In a competitive music marketplace, almost professional is not good enough.
Consulting an engineer's mastering checklist before every final render is a simple habit that catches this kind of error every time.
Enhance your masters with professional dithering support
Understanding dithering is a major step forward for any musician or label serious about release quality. But knowing the theory and executing it perfectly on every project are two different things, and this is exactly where professional mastering support makes the difference.

At LB-Mastering Studios, our Grammy-winning engineers apply correct dithering as a standard part of every mastering project, whether for streaming, CD, vinyl, or high-resolution delivery. We work with hybrid analog-digital signal chains, vintage equipment, and state-of-the-art tools to ensure your masters are transparent, format-ready, and built to last. We also offer free sample masters so you can hear the difference before committing. If you want every detail handled correctly, from dithering to loudness optimization to DDP file creation, reach out to us at LB-Mastering Studios and let us bring your music to its full potential.
Frequently asked questions
Is dithering necessary for every mastering project?
Dithering is necessary whenever you reduce bit depth, such as exporting a 24-bit mix to 16-bit for CD or streaming. If you are staying at the same bit depth throughout, dithering may not be required, but it is still best practice when delivering consumer formats.
How loud is the noise added by dithering?
Dither noise is extremely quiet and randomized, generally masked entirely by the music itself, making it effectively inaudible under normal listening conditions. It sits well below the audible threshold of most playback systems.
Can you apply dither to a track more than once?
No. Dither should be applied only once at the final export stage. Applying it multiple times compounds the noise floor and defeats the purpose of using it in the first place.
Is noise-shaped dithering always better?
Noise-shaped dither can improve perceived quality for certain genres like classical and jazz, but improvements are conditional and depend on the source material and format. It is not universally superior and can cause problems if misapplied to heavily compressed pop or EDM masters.