TL;DR:
- Reference tracks serve as objective benchmarks for tonal balance, loudness, and stereo width in mastering.
- Choosing genre-matched, high-quality, and familiar references ensures accurate and helpful comparisons.
- Proper use of references involves loudness matching, element-focused comparison, and avoiding direct copying.
You finish your mix, send it off for mastering, and wait with real excitement. Then you hear it back and something feels off. It doesn't hit as hard or breathe as wide as the tracks you love. You're not alone in that frustration, and the cause is often simpler than you think. Even seasoned mastering engineers rely on reference tracks to calibrate their ears and guide every critical decision in a session. Most independent musicians either skip this step entirely or use it incorrectly. This guide breaks down exactly what reference tracks are, how to choose them, and how to put them to work so your masters finally sound release-ready.
Table of Contents
- What are reference tracks and why do they matter?
- How to select and prepare effective reference tracks
- How to use reference tracks when mastering
- Common pitfalls and essential expert tips
- Why most indie musicians misuse references—and how to do it right
- Enhance your mastering: Professional services and free resources
- Frequently asked questions
Key Takeaways
| Point | Details |
|---|---|
| Reference tracks guide quality | Well-chosen references help set the standard for tonal balance, loudness, and polish in mastering. |
| Selection is crucial | Choose references from similar genres and arrangements for meaningful, reliable results. |
| Level-match for objectivity | Always loudness-match references to avoid bias when comparing your master. |
| Use as a tool, not a template | Let references inform your decisions while preserving your unique artistic vision. |
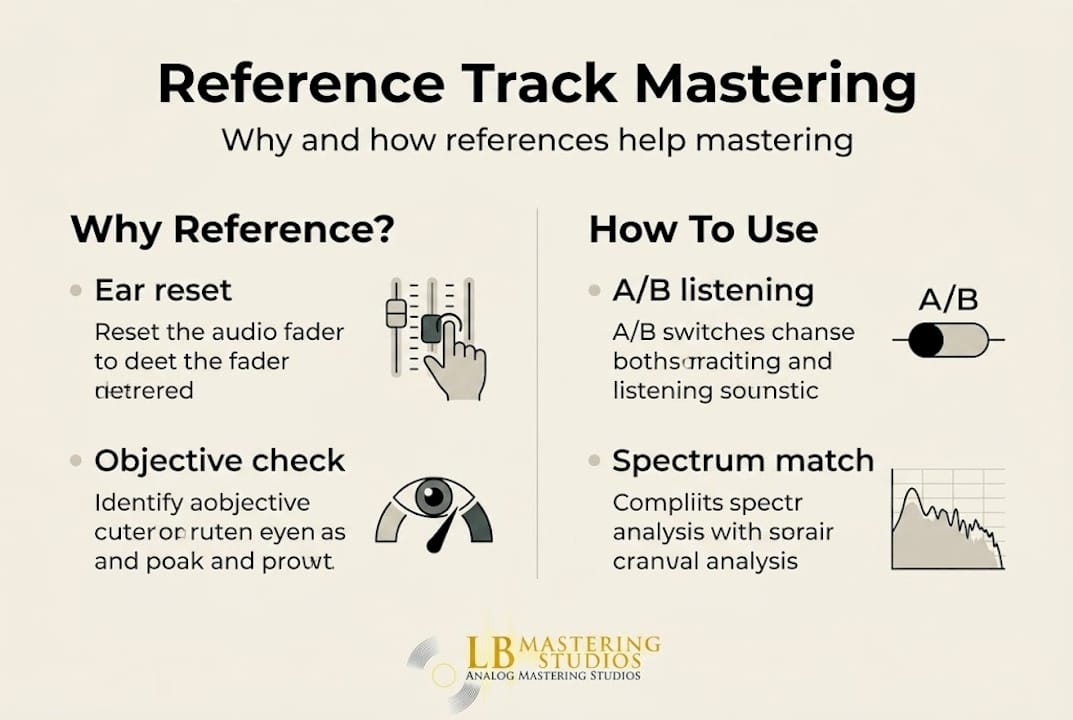
What are reference tracks and why do they matter?
Reference tracks are not a shortcut or a crutch. They are a professional calibration tool. Reference tracks are professionally mixed and mastered songs used as benchmarks in the mastering process to guide decisions on tonal balance, dynamics, loudness, stereo width, and overall polish. In plain terms, they give you and your engineer a shared target to aim at, drawn directly from music that already sounds great in the real world.
Why does this matter so much? Your studio monitors, room acoustics, and even your ears can mislead you after hours of listening. A reference track acts as an anchor, pulling your perception back to objective ground when ear fatigue sets in. Professionals in every genre use them, from major-label pop to independent jazz releases.
What makes a great reference?
Not every hit song makes a good reference. A great reference track shares key characteristics with your project:
- Genre and subgenre match: A punchy trap record is a poor reference for a warm, acoustic folk album.
- Similar instrumentation: A track built around similar elements (real drums vs. programmed, full band vs. duo) will give you more meaningful comparisons.
- Professional production quality: Only reference masters that you know were mixed and mastered to an exceptional level.
- Matching energy and arrangement density: A sparse arrangement gives you misleading loudness readings compared to a densely layered production.
- Tracks you personally trust: Familiarity with how a song sounds on multiple systems is a huge advantage.
| Reference quality factor | Why it matters |
|---|---|
| Genre match | Ensures tonal expectations are relevant |
| Lossless file format | Avoids compression artifacts skewing analysis |
| Arrangement density | Keeps loudness and dynamic comparisons accurate |
| Production era | Ensures loudness standards are current |
| Personal familiarity | Allows confident, reliable comparison |
A professional reading of a reference track is never about copying it. Think of it the way a painter studies a master's technique. You're learning how decisions translate to the listener's ear, not tracing an outline. Your step-by-step mastering guide should always treat references as a compass, not a destination.
"The goal is not to make your track sound like someone else's track. The goal is to make informed, artistic decisions backed by proven sonic benchmarks."
Understanding how a polished, commercially successful record handles low-end weight, vocal presence, or high-frequency air gives you a clear picture of where your own master stands in relation to what listeners expect. References reveal gaps you might never notice otherwise, especially if your monitoring environment isn't perfectly treated. For a broader look at music distribution standards and how finished masters fit into the release chain, familiarizing yourself with delivery expectations is equally important.
How to select and prepare effective reference tracks
Understanding what makes a reference track effective leads naturally to actually picking and preparing them for your project. Choosing poorly here wastes time and leads you in the wrong direction.
- Start with your genre and mood. Think carefully about the feel of your track, not just the genre label. A dark, atmospheric trap song should reference other dark, atmospheric trap records, not mainstream pop-trap hybrids.
- Prioritize lossless files. Wherever possible, source WAV or AIFF files rather than MP3s or Spotify streams. Compressed files introduce small but measurable artifacts that can skew your spectral analysis. Choose lossless, genre-matched files and aim for three to five references for varied strengths, including vocal clarity and low-end impact.
- Gather three to five references with specific jobs. One track might be your low-end reference. Another might be your vocal clarity target. A third might be your stereo width benchmark. Assigning each reference a specific purpose keeps your comparisons focused and actionable.
- Loop the loudest section. The chorus or drop of most commercial tracks exposes the full frequency range. Loop that section rather than starting from the quiet intro. This gives you the most complete tonal picture for comparison.
- Normalize your references before your session. Bring all your reference files to a consistent perceived loudness level before your session starts. This prevents loudness bias from distorting your impressions before you even begin mastering.
- Build and maintain a reference library. Over time, collecting high-quality references by genre, tempo, and energy level saves you significant preparation time on future projects.
Pro Tip: Create a dedicated reference folder in your project templates, organized by genre and energy. When a new project comes in, you can pull from a tested library instead of scrambling to find suitable tracks under session pressure. Referencing your own mastering checklist alongside these tracks keeps every session structured and consistent.
It is also worth thinking about what you're trying to achieve in specific frequency areas. If your project has clarity problems in the upper midrange, select a reference known for its transparent, detailed vocal sound. If your track has a complex, layered low end, pick a reference that handles sub-bass and kick interaction cleanly. Targeted referencing like this translates directly to better, faster decisions when you're improving track clarity during the mastering session.
How to use reference tracks when mastering
Once your references are ready, it's time to use them throughout your mastering session for reliable results. Having the right tracks is only half the work. How you use them makes all the difference.
- Import your references onto separate channels in your DAW. Keep them on dedicated tracks with solo and mute access so you can switch instantly without losing your place in the processing chain.
- Match perceived loudness before every comparison. This is the most critical step. Import your reference on a separate DAW channel and match perceived loudness using a gain plugin and a LUFS meter targeting around -14 LUFS for streaming platforms, eliminating loudness bias during comparison.
- Compare section to section, not song to song. Never compare the quiet intro of your track to the roaring chorus of your reference. Match energy levels structurally. Chorus to chorus, drop to drop, verse to verse.
- Focus on one element at a time. When you A/B switch, focus exclusively on the kick drum. Then the vocal. Then the overall stereo width. Trying to assess everything at once leads to vague, unhelpful impressions.
- Use analytical tools alongside your ears. References calibrate ears before processing and guide EQ adjustments with broad Q settings and cuts or boosts under four decibels. If you need more than four to six decibels of correction, the problem belongs in the mix. Use spectrum analyzers, sidechain EQ overlays like FabFilter Pro-Q, or dedicated reference plugins such as REFERENCE by Mastering The Mix, Metric AB, or iZotope Ozone Tonal Balance.
| Comparison method | Best use case |
|---|---|
| Spectrum analyzer overlay | Identifying frequency imbalances objectively |
| LUFS level matching | Eliminating loudness bias in A/B comparison |
| Waveform density check | Comparing dynamic range and limiting depth |
| Stereo width meters | Evaluating imaging differences between tracks |
| Reference plugins (Metric AB) | Fast A/B switching with instant gain matching |
Pro Tip: If you find yourself reaching for more than four decibels of EQ boost or cut to match a reference, stop and send the track back for mix revisions. Mastering cannot fix structural mix problems, and forcing large corrections degrades your sound more than it helps. Always check optimal loudness in mastering standards before your limiter settings are finalized.
Use your references both before you begin processing and after. Before processing, they set your tonal expectations and warm up your ears. After processing, they tell you if your decisions have brought you closer to or further from your target. This before-and-after referencing is standard practice at the professional level and is part of every thorough mastering guide worth following.
Common pitfalls and essential expert tips
While references are powerful, there are real pitfalls and expert-level nuances to avoid in your mastering practice. Knowing what not to do is just as valuable as knowing what to do.
- Don't reference across incompatible arrangements. Match arrangement intensity and key for accurate loudness and dynamic range comparisons. A track with a long ambient intro reads very differently on a LUFS meter than a track that opens at full intensity.
- Never try to copy a reference exactly. The goal is informed decision-making, not cloning. Reference intermittently as an ear reset to combat fatigue, and compare masters to masters. Professionals like Nicky Romero and Adam Hawkins use references for translation checks after streaming normalization, not to create identical-sounding records.
- Avoid referencing mixes against masters. Your unmastered mix will always sound thin and quiet next to a finished master. This comparison misleads you about the actual quality of your mix decisions. Keep masters compared to masters throughout the process.
- Don't crush your dynamics to match a louder reference. Louder is not always better, and sacrificing dynamic range to chase the loudness of an older, pre-streaming-era master is counterproductive in 2026.
- Recognize when a reference is genuinely wrong for your project. Over-reliance risks imitation over originality, and some engineers find mismatched references more distracting than helpful, describing it as comparing a giraffe to a car. If a reference is pulling your decisions in the wrong direction, replace it.
"Reference tracks inform artistic choices. They don't replace them. The best masters sound like themselves—just better."
Use references as an ear reset during long sessions, especially after thirty to forty minutes of continuous critical listening. Step away, listen to your reference on its own, and come back to your master fresh. This simple habit catches tonal drift that builds up gradually without you noticing. It also reinforces your target sound at a neurological level, keeping your instincts aligned with your goals. Exploring loudness for 2026 playback standards and understanding current mastering equipment examples used by professionals helps you set realistic expectations for what well-used references can help you achieve.
Why most indie musicians misuse references—and how to do it right
Over 44 years of working with independent artists and major labels, we've seen one mistake repeat itself constantly. An artist finishes a track, picks the number one song on the charts that week as their reference, and walks into mastering expecting the same result. But that chart-topping track is almost never in the same genre, key, energy level, or arrangement density as their own music. The comparison pulls the mastering engineer in completely the wrong direction.
The best results we've seen come from artists who understand their own musical intent first. One producer came to us with a deeply personal ambient electronic record. He referenced it against aggressive, loudness-maximized EDM anthems because they were "popular." The result was an over-compressed, lifeless master that lost everything that made his music special. When we started over with three carefully chosen ambient references from artists like Brian Eno and Jon Hopkins, the same record became emotionally powerful and tonally rich.
That experience taught us something worth sharing: a reference track is only as good as your clarity about what your own music is trying to be. Use the professional mastering process as a structured framework and let your references serve your artistic vision, not override it. When you approach references as flexible tools rather than rigid targets, they stop being a source of confusion and start being one of the most reliable advantages you have.
Enhance your mastering: Professional services and free resources
If you're ready to take your releases from sounding good to sounding exceptional, the difference often comes down to having an experienced engineer who knows how to apply reference tracks with precision and intent.
At LB-Mastering Studios, we bring over 44 years of Grammy-winning expertise to every project, whether you're releasing on streaming platforms, vinyl, or CD. Our hybrid analog-digital signal chain is built to deliver warmth, clarity, and the kind of loudness that competes on any platform. We offer stereo mastering, stem mastering, vinyl mastering, and audio restoration, all with direct access to your mastering engineer. Download our free mastering checklist to prepare your tracks before submission, and request a free sample master to hear the difference for yourself at lbmastering.com.
Frequently asked questions
What are the most common mistakes when using reference tracks for mastering?
The biggest mistakes are not matching loudness levels, picking unrelated genres, and copying references too literally instead of making context-aware adjustments that serve your specific track and artistic goals.
How many reference tracks should I use in a session?
Using three to five reference tracks is ideal, as each can highlight unique strengths like vocal clarity, bass response, stereo width, or overall loudness character.
Do professional mastering engineers always use reference tracks?
While most pros use them for objectivity and translation, some experienced engineers rely on internalized sonic standards or a carefully prepared custom mix reference built from years of working in calibrated environments.
Which tools or plugins make referencing easier during mastering?
Popular choices include spectrum analyzers, sidechain EQ overlays, and dedicated reference plugins like Mastering The Mix REFERENCE, Metric AB, or iZotope Ozone Tonal Balance for fast and accurate A/B switching.